LED Strip
In this section we go a bit more into the details about what’s a led strip and how it works.
An LED strip (Centiloc) represents a segment of a physical LED strip.
A single physical LED strip can therefore contain multiple LED strips (Centiloc) in the system configuration.
The term LED segments will be used to describe Centiloc’s LED strip.
The term physical LED strip will be used to describe the actual full LED strip.
LED segments allow visual feedback on shelves by lighting up the position of a product.
They are attached to a shelf and controlled by a LED Box.
Each LED segment have several attributes:
| Name | Description |
|---|---|
id |
LED Strip ID from the LED Box configuration. |
lbx |
LED Box serial number. |
x_axis |
Shelf axis of the segment (X or Y). true → X axis |
is_inverted |
Defines whether the LED strip direction is reversed relative to the shelf axis. |
offset_mm |
Distance between the beginning of the physical LED strip and the start of the segment. |
shelf_start_mm |
The shelf coordinate from which the LED segment starts. |
shelf_stop_mm |
The shelf coordinate at which the LED segment stops. |
To find the strip ID:
- Go to
Ledboxpage on CentUI. - Click on
Infobutton next to the correct LED Box. - Check strip ID based on the strip address.
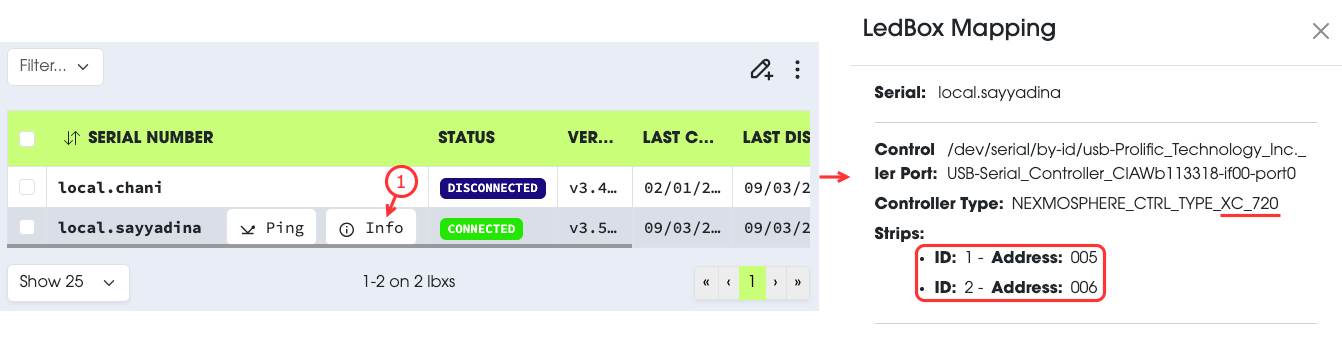
In the LED Box information you have the Nexmosphere model used to control LED strips.
To find the positions of the address, check out the quick-start guides here.
Finding the right strip may be complicated when you are not familiar with technical documentation.
One simple way of identifying which strip is which is to turn on some LEDs on them.
To do so:
- Select the LED Box.
- Select
Turn Onfrom the action menu. - Create a temporary segment of at least a few millimeters.
- Submit the request.
This should turn on a small area on the strip you selected.
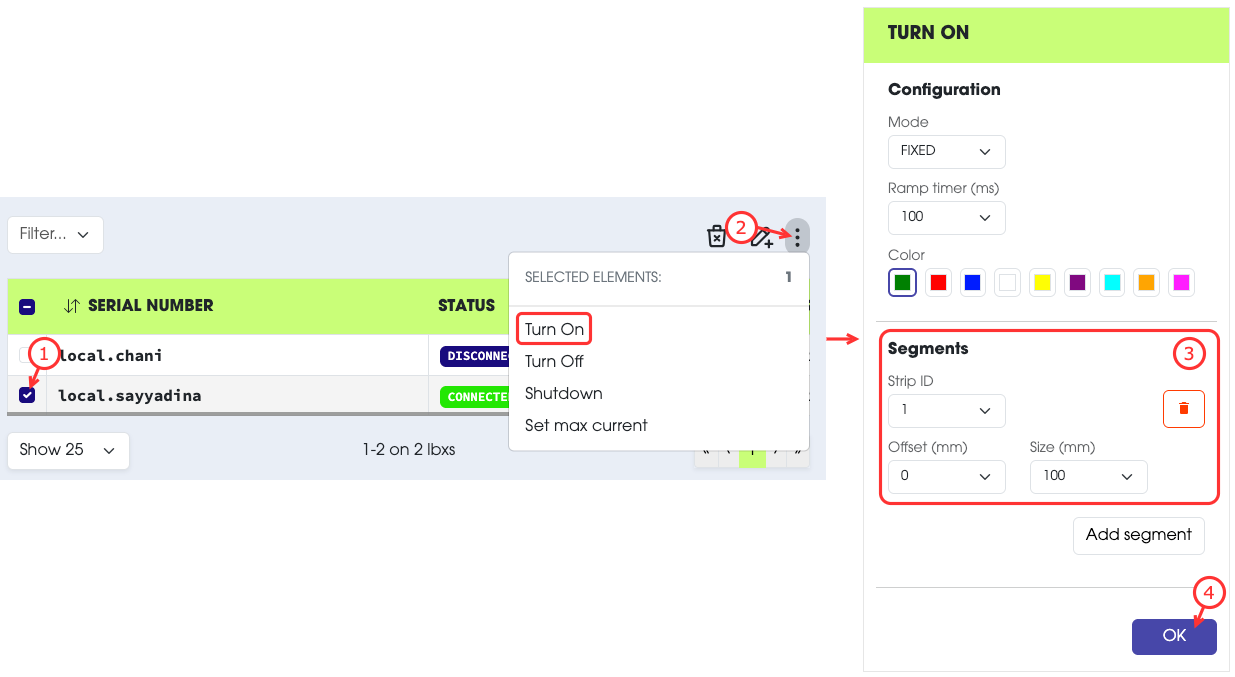
Do not forget to Turn off the strip afterward.
As said previously, LED segment has:
- An axis (X or Y).
- An origin (offset).
- A size.
To explain how to determinate them, we are taking this setup as an example (we assume the shelf dimensions are 500mm x 200mm):
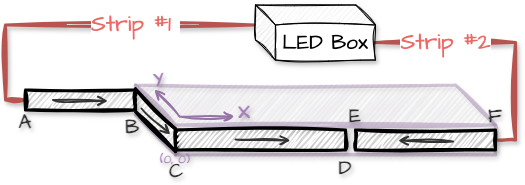
Points A, B, C, D, E and F represent reference positions on the shelf used to illustrate the LED segment configuration.
In this example we have 2 LED strips and 3 LED segments:
- Segment 1 (C→B):
- Segment is on strip ID = 1.
- Segment is on Y axis
- Segment is inverted. The strip direction is opposed to the shelf Y axis direction.
- Segment offset is
ACmmfrom the beginning of the physical strip. - Segment starts at
C=0mmand stops atB=200mm.
- Segment 2 (C→D):
- Segment is on strip ID = 1.
- Segment is on X axis
- Segment is not inverted. The strip direction is the same as the shelf X axis direction.
- Segment offset is
(AC + BC) mmfrom the beginning of the physical strip. - Segment starts at
C=0mmand stops atD=250mm.
- Segment 3 (E→F):
- Segment is on strip ID = 2.
- Segment is on X axis
- Segment is inverted. The strip direction is opposed to the shelf X axis direction.
- Segment offset is
0mmfrom the beginning of the physical strip. - Segment starts at
E=250mmand stops atF=500mm.