Create and Update a Shelf
Use EnrolUI to create your shelves.
You can also perform the same operation using the Inventory API. Contact Centiloc support for more information.
- Having a Centiloc CADS.
- Having an account with editor rights at least.
Follow the initial steps to connect to EnrolUI, then navigate to the Shelf page by clicking the Shelf box.
Once you are on the Shelf page you can click the Create new button.

Creating a shelf requires basic knowledge of YAML.
A shelf is created using a YAML file that describes its configuration.
Below is the structure of the .yaml file:
shelf:
    sn: "Shelf Name"
    floor: 1
    dimensions_mm: [500, 200]
    offsets_mm: [0, 0, 0]
    rot_angles_degree: [0.0, 0.0, 0.0]
    boards:
        - sn: "boardserialnumber"
          offsets_mm: [0, 0]
          z_rot_angle: 0.0
    locations:
        - ref: "Location Name"
          weight: 0
          dimensions_mm: [100, 100]
          origin_coord: [10, 20]
    ledstrips:
        - id: 1
          lbx: "lbx.name"
          x_axis: true
          is_inverted: false
          offset_mm: 0
          shelf_start_mm: 0
          shelf_stop_mm: 500
Refer to the conceptual diagram here: here.
For LED strips you need to have in mind the in-depth LED strip guide.
The fields are described below:
snis the serial number of your shelf. This is how you will identify it. The serial number must be unique.floorindicates the level of the shelf within the furniture. Default value is1.dimensions_mmare the dimensions of the shelf in millimeters on the X and Y axes.offsets_mmare relevant only if the shelf is in a furniture. Offsets are defined on three axes (X, Y, Z) and represent offsets from the furniture reference frame. More about offsets in the details.rot_angles_degreeare relevant only if the shelf is in a furniture. The rotations angles are on three axis (X, Y and Z) and are used if your shelf isn’t on the same surface as your furniture. More about rotation angles in the details.boardsis a list of boards inside the shelf.locations(optional) is a list of locations present on the shelf.refthe reference of your location. This is how you will identify it. The reference must be unique.weightthe layer of the location. If you have only a few locations, the weight can be set to 1. More about it in the details.dimensions_mmthe dimensions of the location on the shelf. More about it in the details.origin_coordthe origin coordinates of the location on the shelf. More about it in the details.
ledstrips(optional) is a list of led strips attached to the shelf.idthe strip ID in the led box configurationlbxthe LED box serial number.x_axisindicates the axis on which the LED strip is mounted. More about it in the details.is_invertedindicates if the direction of the led strip is inverted based on the direction of the shelf axis. More about it in the details.offset_mmis the offset from the physical beginning of the led strip. More about it in the details.shelf_start_mmis the starting point of the strip on the shelf referential. More about it in the details.shelf_stop_mmis the ending point of the strip on the shelf referential. More about it in the details.
If a location does not exist, it will be automatically created. If a led strip does not exist, it will be automatically created.
- Click on the
YAMLtab. - Click on the
Uploadicon. - Verify the content of your
.ymlfile.
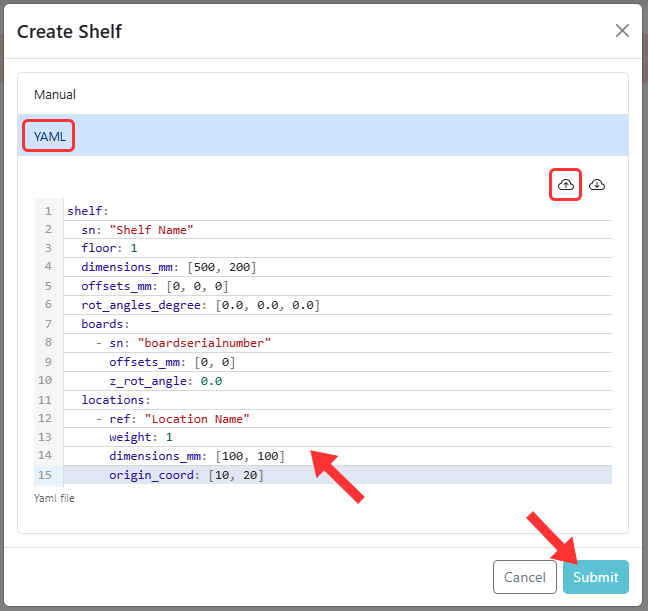
Click on Submit and then close the popup. You can now see the shelf in the table.
To update a shelf, repeat the steps above.
The update process is identical to the creation process.
Be mindful when updating a shelf, all the fields will be overwritten.
This is why you should always keep a version of your.ymlfile to make sure to modify only the fields you need to modify.Contact Centiloc support to help you with that if you need help.