Configuration
You can change many settings on your Centiloc boards using centui or the API.
This page explains all the available configuration options.
Some of them require a user account with Maintainer or Admin rights.
See User Roles for more information.
With centui, you can select multiple boards and apply the same configuration to all of them.
The system will apply changes one board at a time.
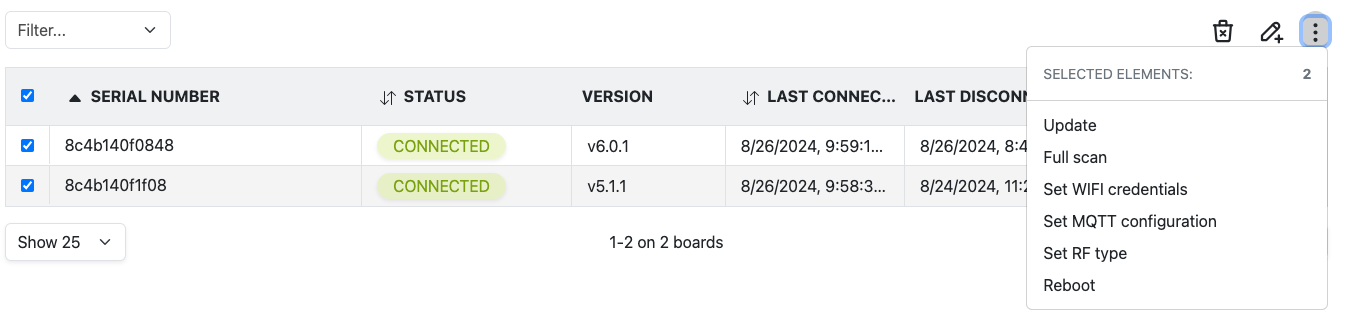
Most configuration changes only take effect after the board is restarted.
Use the Reboot action when you’re done.
This setting controls how your board detects NFC tags.
There are four detection modes available.
In most cases, using ALL gives more flexibility.
If you know exactly which type of NFC tags your system uses, you can select only one type to make detection faster.
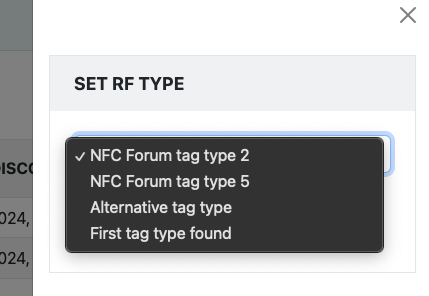
| Option | Description |
|---|---|
| NFC Forum tag type 2 | Detects ISO14443 tags only |
| NFC Forum tag type 5 | Detects ISO15693 tags only |
| Alternative tag type | Alternates between all tag types |
| First tag type found | Scans until one tag type is found, then focuses only on that type |
Choosing a specific NFC type can improve speed but reduces compatibility with other tags.
If you’re unsure which one to pick, keep the default setting or contact our support team for help.
The default configuration is NFC Forum tag type 5.
This option lets you modify some basic properties of your board:
- Dimensions – Only affects how the board appears in the user interface.
- Margins – Defines an area where small movements are ignored. Events inside this area won’t be recorded.
- Disable Geolocation – When enabled, the board will always report its position as
x=0, y=0.
A Full Scan asks the board to clear its memory and refresh all the information it measures.
When you send a Full Scan request and get the successful response, it means:
- The board has received the request.
- The scan will start as soon as the board is ready — not immediately.
Depending on the number of NFC tags and your RF Type configuration, it can take a few seconds or several minutes.
If the data shown in your dashboard doesn’t seem to match what’s actually on the board, use Full Scan to refresh the information.
Follow the Wi-Fi Configuration Guide for detailed steps.
Don’t forget to restart the board afterward to apply the new settings.
If your setup is On-Premise, configure Wi-Fi (or Ethernet) and MQTT before restarting the board.
Follow the MQTT Configuration Guide for detailed steps.
Don’t forget to restart the board afterward to apply the new settings.
If your setup is On-Premise, configure Wi-Fi (or Ethernet) and MQTT before restarting the board.
Follow the Ethernet Configuration Guide for detailed steps.
Don’t forget to restart the board afterward to apply the new settings.
If your setup is On-Premise, configure Wi-Fi (or Ethernet) and MQTT before restarting the board.
This setting defines how your board reports detected items to the Centiloc Data Platform.
There are two available policies.
For most cases, we recommend using Standard policy.
If some items are not being detected correctly, you can try switching to Partial policy.
| Policy | Description |
|---|---|
| Standard | Normal reporting policy. An item is only reported when it’s detected on both axes (X and Y). This ensures precise positioning. |
| Partial | Reports items detected on at least one axis. This can help if items are not being detected consistently, but geolocation data may be incomplete. Use this policy only if necessary. |
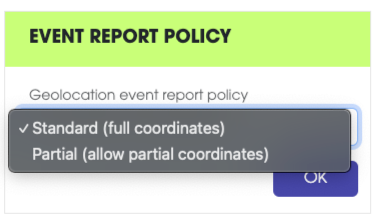
Use Standard policy unless you are troubleshooting detection issues and you know what you are doing.
The partial policy will return events with one of the two axes position at 0 (e.g.
x=0,y=100orx=154,y=0). Therefore the geolocation will be incomplete as one of the coordiante will be0.We do not recommend using this policy with locations.
he Powerdown feature lets you control when your board turns on and off automatically.
This is useful for saving energy or setting precise operating times.
You can configure:
- When the board powers on (Alarm Time)
- How long it stays on (Active Duration)
You can set one, both, or none — depending on your needs.
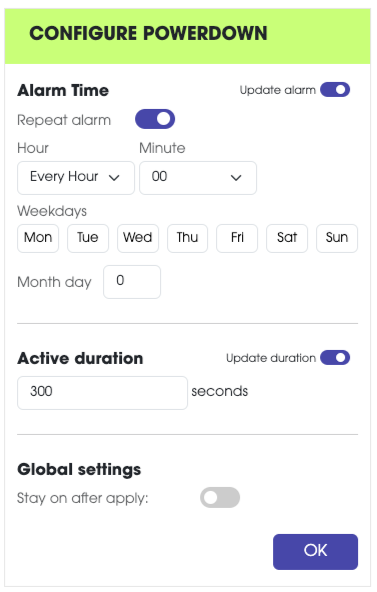
For more detail on how to use this page, please refer to the in-depth guide.
This action restarts the selected board(s), just like if you had turned the power off and back on.