First Steps
This tutorial shows how to enrol and configure your first items.
- A Centiloc Board
- NFC Tags
- Your TenantID
- Having an account with user rights at least
Inventory module is in active development. Thus, information, views or even page URL are subject to change.
Your first Enrolui connection is described in previous section and is the same as Centui.
Let’s browse https://demo.enrolui.centiloc.com, and log in with your configured account.
You may need to replace
demoby yourtenantID.
Click on the box called UID configuration.
You can chose to retrieve items’ UID in 3 ways:
- From a location, this find UIDs detected on a given location.
- From a board, this find UIDs detected on a given board.
- From a text file, this read the file for UIDs.
Select the location reference from the list. You can start typing to reduce the list.

The location reference can be found in theLocationview.
This view is available from the homepage of Enrolui by clicking onLocationbox.
Enter the board serial number in the box.

The board serial number can be found at the bottom of your CADS. You can see a Serial Number composed of 12 caracters.
See here for more details.
Click on Select a file and a file browser will open. Select your .txt file.

The file content is very simple. Here is an example:
8314553d080104e0
d743ea3c080104e0
8d4a7e3c080104e0
9abd703c080104e0
Once you have selected the way to retrieve items.
Press Submit button.
The configuration will be assigned to the items (uids).
This configuration is composed of:
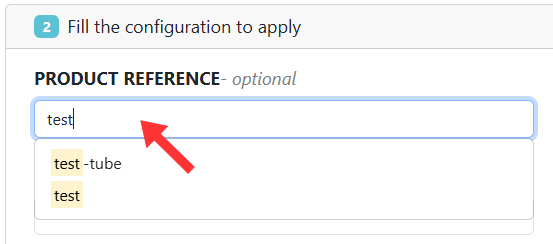
- The product reference, the item will be identified as such.
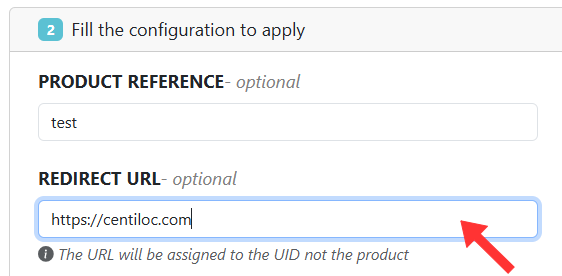
- The redirection url, when taping the item (reading NFC tag) this will redirect to this url.
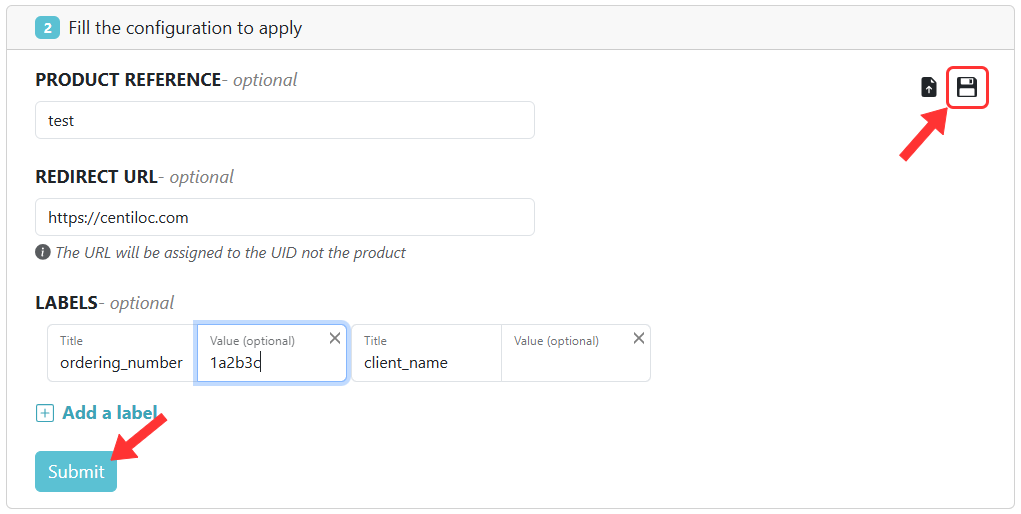
- A set of labels, item will carry its labels enriching even more the NFC event data.
You can chose to write the configuration from scratch or upload it from a file.

The location reference can be found in theProductview.
This view is available from the homepage of Enrolui by clicking onProductbox.
The redirection URL will be applied to the items UID and not to the product.
This will be used for tapping

- You can click
Add Labelto create a new label. A label has a title and an value (optional). - You can edit the title and value of a label.
- You can remove a label by clicking the
xbutton.
If you add a label with a title which already exists, the previous value will be overriden.
The label title must not contain the separator::.
- You can click the save icon to save your configuration as a yaml (
yml) file to reuse it later on. - Click
Submitbutton to proceed to next step and validate your configuration.

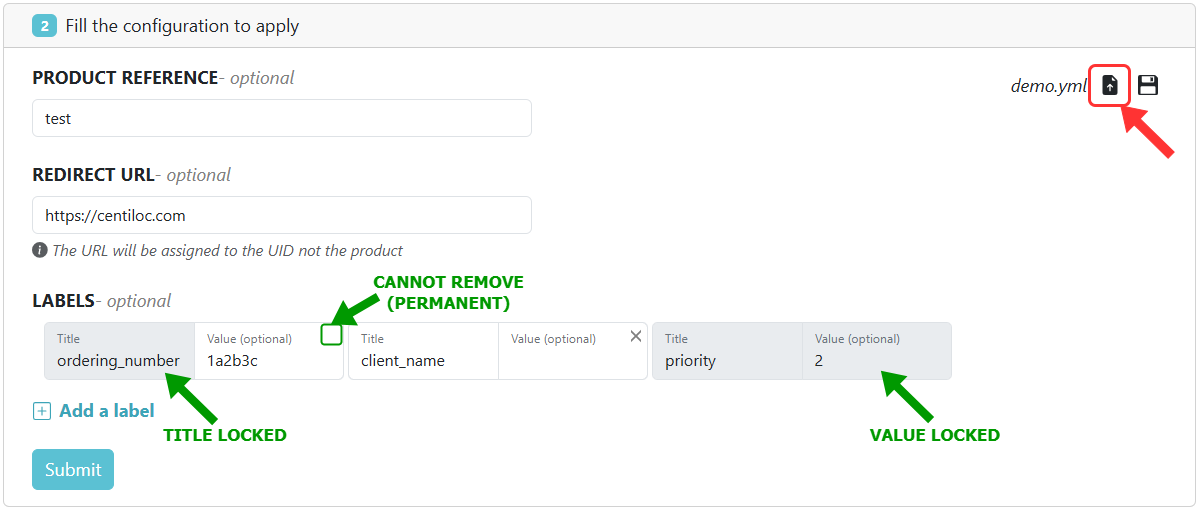
Click on the Load file button and select your yaml (.yml) configuration file.
The configuration will fill the fields accordingly.

Here is an example of a configuration file:
product: "test"               # Product reference
url: "https://centiloc.com"   # Redirection URL
labels:                       # List of labels
  - title: "ordering_number"  # Label#1 title
    value: "1a2b3c"           # Label#1 value
    keyLocked: true           # Disabled modification of title (default: false)
    permanent: true           # Disabled delete button of label (default: false)
  - title: "client_name"      # Label#2 title (no value)
  - title: "priority"         # Label#3 title
    value: "2"                # Label#3 value
    keyLocked: true           # Disabled modification of title (default: false)
    valueLocked: true         # Disabled modification of value (default: false)
    permanent: true           # Disabled delete button of label (default: false)
Now, this section should appear:

You can find the:
- Number of items on the board / location / file.
- This is the number of items detected (in real time) on the board / location.
- For a file, this is the number of item in the file.
- Number of enroled items on the board / location / file.
- This is the number of items detected and enroled (in real time) on the board / location.
- For a file, this is the number of enroled item in the file.
- Total number of enroled items for the campaign. A campaign reflects the configuration. The number of items for a campaign is the number of items that has been configured with the configuration of the campaign.
- Total number of enroled items for the session. A session is more specific. It also reflects the configuration, but also where the items were configured. This means that it reflects the number of items that has been configured with the configuration on a location or board.
When using atext filethe line session and campaign will not show.
If the number of items detected on the surface and the number of items enroled on the surface are not the same, user can click on Start enrolment button.
This will enrol the items detected on the surface, incrementing the items enroled counter.
The icon on the left can show three different state:
 There is a missmatch between detected items and enroled items.
 Enrolment is in progress. Please wait.
 Everything is good. Numbers are matching.
Clicking the switch button Automatic mode will trigger this mode.
In this mode, there is no need to click on any button.
Any new NFC event will be automatically detected and enroled by the system.
User can see both number incrementing at the same time.

You need to be inManual Mode.
In case of an enrolment that should not have happened, there is the possibility to cancel it.
- Place items that have been wrongfully enroled with the configuration.
- Click on
Reset items.
This will remove the configuration set with this campaign.
This will not remove other configuration, it’ll only remove the configuration of your current campaign.

You need to be inManual Mode.
It is possible to save files about the session and campaign.
To do so simply click on the Download enroled items list button.
This will save two csv files.

This is what the files look like:
- Campaign file
UID;Product;URL;Labels
dd84e93c080104e0;test;https://centiloc.com;client_name,ordering_number::1a2b3c
af83e93c080104e0;test;https://centiloc.com;client_name,ordering_number::1a2b3c
9884e93c080104e0;test;https://centiloc.com;client_name,ordering_number::1a2b3c
5f83e93c080104e0;test;https://centiloc.com;client_name,ordering_number::1a2b3c
6583e93c080104e0;test;https://centiloc.com;client_name,ordering_number::1a2b3c
6683e93c080104e0;test;https://centiloc.com;client_name,ordering_number::1a2b3c
9984e93c080104e0;test;https://centiloc.com;client_name,ordering_number::1a2b3c
6083e93c080104e0;test;https://centiloc.com;client_name,ordering_number::1a2b3c
- Session file
UID;Product;URL;Labels;Board SN;Location
dd84e93c080104e0;test;https://centiloc.com;client_name,ordering_number::1a2b3c;8c4b140fd674;
af83e93c080104e0;test;https://centiloc.com;client_name,ordering_number::1a2b3c;8c4b140fd674;
9884e93c080104e0;test;https://centiloc.com;client_name,ordering_number::1a2b3c;8c4b140fd674;
5f83e93c080104e0;test;https://centiloc.com;client_name,ordering_number::1a2b3c;8c4b140fd674;
6583e93c080104e0;test;https://centiloc.com;client_name,ordering_number::1a2b3c;8c4b140fd674;
6683e93c080104e0;test;https://centiloc.com;client_name,ordering_number::1a2b3c;8c4b140fd674;
9984e93c080104e0;test;https://centiloc.com;client_name,ordering_number::1a2b3c;8c4b140fd674;
6083e93c080104e0;test;https://centiloc.com;client_name,ordering_number::1a2b3c;8c4b140fd674;
You have different columns:
UID: the uid of the enroled item.Product: the product set during the enrolment.URL: the redirection url set during the enrolment.Labels: a list of labels set during the enrolment.Board SN(session only): the board SN used for the enrolment.Location(session only): the location reference used for the enrolment.